Wednesday, April 22, 2009

Creating an Input Method

To create an input method (IME) for entering text into text fields
and other Views, you need to extend the InputMethodService.
class. This class provides much of the basic implementation for an input
method, in terms of managing the state and visibility of the input method and
communicating with the currently visible activity.


A good starting point would be the SoftKeyboard sample code provided as part
of the SDK. You can modify the sample code to start building your own input
method.


An input method is packaged like any other application or service. In the
AndroidManifest.xml file, you declare the input method as a
service, with the appropriate intent filter and any associated meta data:


<manifest xmlns:android="http://schemas.android.com/apk/res/android"
package="com.example.fastinput">

<application android:label="@string/app_label">

<!-- Declares the input method service -->
<service android:name="FastInputIME"
android:label="@string/fast_input_label"
android:permission="android.permission.BIND_INPUT_METHOD">
<intent-filter>
<action android:name="android.view.InputMethod" />
</intent-filter>
<meta-data android:name="android.view.im" android:resource="@xml/method" />
</service>

<!-- Optional activities. A good idea to have some user settings. -->
<activity android:name="FastInputIMESettings" android:label="@string/fast_input_settings">
<intent-filter>
<action android:name="android.intent.action.MAIN"/>
</intent-filter>
</activity>
</application>
</manifest>


If your input method allows the user to tweak some settings, you should
provide a settings activity that can be launched from the Settings application.
This is optional and you may choose to provide all user settings directly in
your IME's UI.


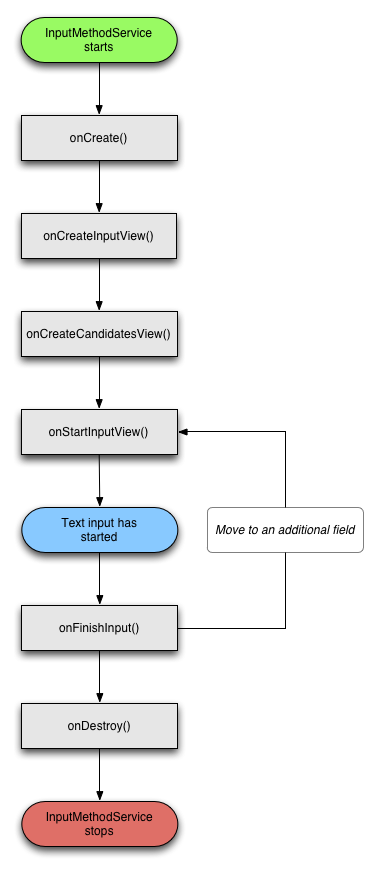
The typical life-cycle of an InputMethodService looks like
this:


Visual Elements


There are two main visual elements for an input method—the input view and the
candidates view. You don't have to follow this style though, if one of them is
not relevant to your input method experience.


Input View


This is where the user can input text either in the form of keypresses,
handwriting or other gestures. When the input method is displayed for the first
time, InputMethodService.onCreateInputView() will be called. Create
and return the view hierarchy that you would like to display in the input method
window.


Candidates View


This is where potential word corrections or completions are presented to the
user for selection. Again, this may or may not be relevant to your input method
and you can return null from calls to
InputMethodService.onCreateCandidatesView(), which is the default
behavior.


Designing for the different Input Types


An application's text fields can have different input types specified on
them, such as free form text, numeric, URL, email address and search. When you
implement a new input method, you need to be aware of the different input types.
Input methods are not automatically switched for different input types and so
you need to support all types in your IME. However, the IME is not responsible
for validating the input sent to the application. That's the responsibility of
the application.


For example, the LatinIME provided with the Android platform provides
different layouts for text and phone number entry:


InputMethodService.onStartInputView() is called with an
EditorInfo
object that contains details about the input type and other
attributes of the application's text field.

(EditorInfo.inputType
& EditorInfo.TYPE_CLASS_MASK
) can be one of many different values,
including:


  • TYPE_CLASS_NUMBER

  • TYPE_CLASS_DATETIME

  • TYPE_CLASS_PHONE

  • TYPE_CLASS_TEXT


See android.text.InputType for more details.


EditorInfo.inputType can contain other masked bits that
indicate the class variation and other flags. For example,
TYPE_TEXT_VARIATION_PASSWORD or TYPE_TEXT_VARIATION_URI
or TYPE_TEXT_FLAG_AUTO_COMPLETE.


Password fields


Pay
specific attention when sending text to password fields. Make sure that
the password is not visible within your UI — neither in the input
view or the candidates view. Also, do not save the password anywhere without
explicitly informing the user.


Landscape vs. portrait


The UI needs to be able to scale between landscape and portrait orientations.
In non-fullscreen IME mode, leave sufficient space for the application to show
the text field and any associated context. Preferably, no more than half the
screen should be occupied by the IME. In fullscreen IME mode this is not an
issue.


Sending text to the application


There are two ways to send text to the application. You can either send
individual key events or you can edit the text around the cursor in the
application's text field.


To send a key event, you can simply construct KeyEvent objects and call
InputConnection.sendKeyEvent(). Here are some examples:


InputConnection ic = getCurrentInputConnection();
long eventTime = SystemClock.uptimeMillis();
ic.sendKeyEvent(new KeyEvent(eventTime, eventTime,
KeyEvent.ACTION_DOWN, keyEventCode, 0, 0, 0, 0,
KeyEvent.FLAG_SOFT_KEYBOARD|KeyEvent.FLAG_KEEP_TOUCH_MODE));
ic.sendKeyEvent(new KeyEvent(SystemClock.uptimeMillis(), eventTime,
KeyEvent.ACTION_UP, keyEventCode, 0, 0, 0, 0,
KeyEvent.FLAG_SOFT_KEYBOARD|KeyEvent.FLAG_KEEP_TOUCH_MODE));


Or use the convenience method:


InputMethodService.sendDownUpKeyEvents(keyEventCode);


Note:
It is recommended to use the above method for certain fields such as
phone number fields because of filters that may be applied to the text
after each key press. Return key and delete key should also be sent as
raw key events for certain input types, as applications may be watching
for specific key events in order to perform an action.


When editing text in a text field, some of the more useful methods on
android.view.inputmethod.InputConnection are:


  • getTextBeforeCursor()

  • getTextAfterCursor()

  • deleteSurroundingText()

  • commitText()


For example, let's say the text "Fell" is to the left of the cursor
and you want to replace it with "Hello!":


InputConnection ic = getCurrentInputConnection();
ic.deleteSurroundingText(4, 0);
ic.commitText("Hello", 1);
ic.commitText("!", 1);


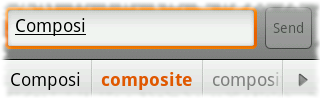
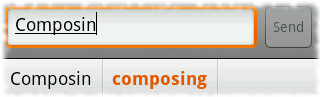
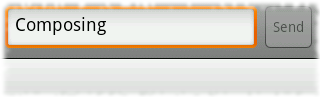
Composing text before committing


If your input method does some kind of text prediction or requires multiple
steps to compose a word or glyph, you can show the progress in the text field
until the user commits the word and then you can replace the partial composition
with the completed text. The text that is being composed will be highlighted in
the text field in some fashion, such as an underline.


InputConnection ic = getCurrentInputConnection();
ic.setComposingText("Composi", 1);
...
ic.setComposingText("Composin", 1);
...
ic.commitText("Composing ", 1);


Intercepting hard key events


Even though the input method window doesn't have explicit focus, it receives
hard key events first and can choose to consume them or forward them along to
the application. For instance, you may want to consume the directional keys to
navigate within your UI for candidate selection during composition. Or you may
want to trap the back key to dismiss any popups originating from the input
method window. To intercept hard keys, override
InputMethodService.onKeyDown() and
InputMethodService.onKeyUp(). Remember to call
super.onKey* if you don't want to consume a certain key
yourself.


Other considerations


  • Provide a way for the user to easily bring up any associated settings
    directly from the input method UI

  • Provide
    a way for the user to switch to a different input method (multiple
    input methods may be installed) directly from the input method UI.

  • Bring
    up the UI quickly - preload or lazy-load any large resources so that
    the user sees the input method quickly on tapping on a text field. And
    cache any resources and views for subsequent invocations of the input
    method.

  • On the flip side, any large memory allocations should
    be released soon after the input method window is hidden so that
    applications can have sufficient memory to run. Consider using a
    delayed message to release resources if the input method is in a hidden
    state for a few seconds.

  • Make sure that most common characters
    can be entered using the input method, as users may use punctuation in
    passwords or user names and they shouldn't be stuck in a situation
    where they can't enter a certain character in order to gain access into
    a password-locked device.


Tuesday, April 21, 2009

On-screen Input Methods


Starting from Android 1.5, the Android platform offers an Input Method
Framework (IMF) that lets you create on-screen input methods such as software
keyboards. This article provide an overview of what Android input method editors
(IMEs) are and what an application needs to do to work well with them. The IMF
is designed to support new classes of Android devices, such as those without
hardware keyboards, so it is important that your application works well with the
IMF and offers a great experience for users.


What is an input method?


The Android IMF is designed to support a variety of IMEs, including soft
keyboard, hand-writing recognizers, and hard keyboard translators. Our focus,
however, will be on soft keyboards, since this is the kind of input method that
is currently part of the platform.


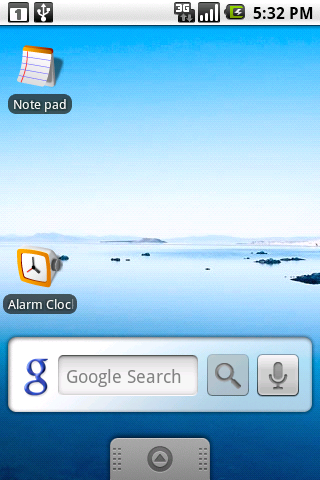
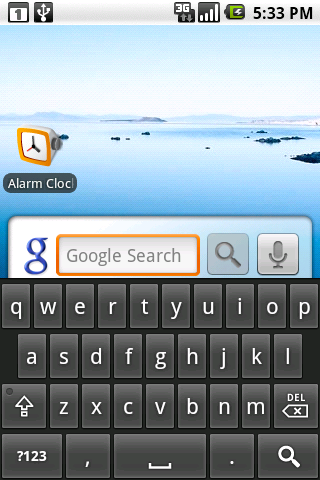
A user will usually access the current IME by tapping on a text view to
edit, as shown here in the home screen:


The soft keyboard is positioned at the bottom of the screen over the
application's window. To organize the available space between the application
and IME, we use a few approaches; the one shown here is called pan and
scan
, and simply involves scrolling the application window around so that
the currently focused view is visible. This is the default mode, since it is the
safest for existing applications.


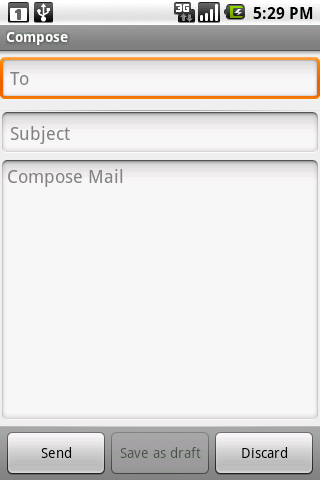
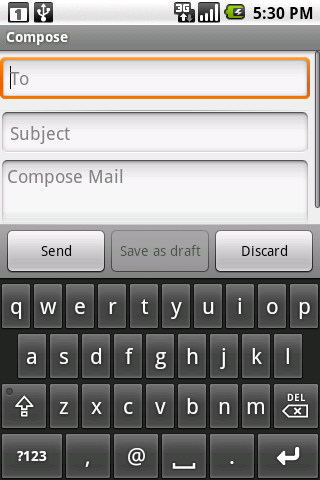
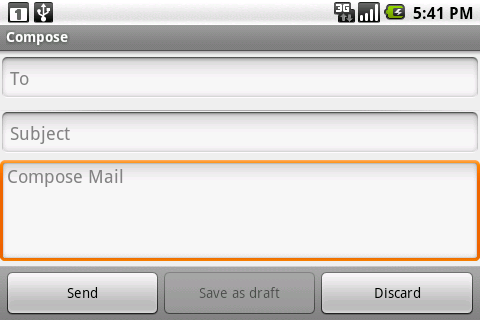
Most often the preferred screen layout is a resize, where the
application's window is resized to be entirely visible. An example is shown
here, when composing an e-mail message:


The size of the application window is changed so that none of it is hidden by
the IME, allowing full access to both the application and IME. This of course
only works for applications that have a resizeable area that can be reduced to
make enough space, but the vertical space in this mode is actually no less than
what is available in landscape orientation, so very often an application can
already accommodate it.


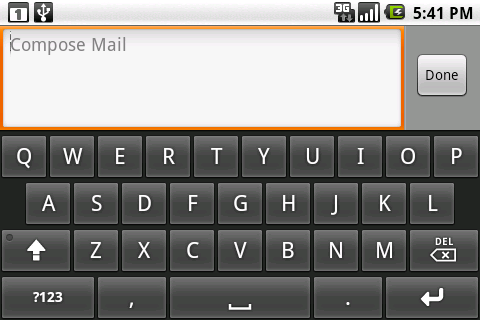
The final major mode is fullscreen or extract
mode. This is used when the IME is too large to reasonably share space
with the underlying application. With the standard IMEs, you will only
encounter this situation when the screen is in a landscape orientation,
although other IMEs are free to use it whenever they desire. In this
case the application window is left as-is, and the IME simply displays
fullscreen on top of it, as shown here:


Because the IME is covering the application, it has its own editing area,
which shows the text actually contained in the application. There are also some
limited opportunities the application has to customize parts of the IME (the
"done" button at the top and enter key label at the bottom) to improve the user
experience.


Basic XML attributes for controlling IMEs


There are a number of things the system does to try to help existing
applications work with IMEs as well as possible, such as:


  • Use pan and scan mode by default, unless it can reasonably guess that
    resize mode will work by the existence of lists, scroll views, etc.

  • Analyze the various existing TextView attributes to guess at the kind of
    content (numbers, plain text, etc) to help the soft keyboard display an
    appropriate key layout.

  • Assign a few default actions to the fullscreen IME, such as "next field"
    and "done".


There are also some simple things you can do in your application that will
often greatly improve its user experience. Except where explicitly mentioned,
these will work in any Android platform version, even those previous to Android
1.5 (since they will simply ignore these new options).


Specifying each EditText control's input type


The most important thing for an application to do is to use the new
android:inputType
attribute on each EditText. The attribute provides much richer
information
about the text content. This attribute actually replaces many existing
attributes (android:password,
android:singleLine,
android:numeric,
android:phoneNumber,
android:capitalize,
android:autoText, and
android:editable). If you specify the older attributes
and the new android:inputType attribute, the system uses
android:inputType and ignores the others.


The android:inputType attribute has three pieces:


  • The class is the overall interpretation of characters. The
    currently supported classes are text (plain text),
    number (decimal number), phone (phone number), and
    datetime (a date or time).

  • The variation is a further refinement on the class. In the
    attribute you will normally specify the class and variant together, with the
    class as a prefix. For example, textEmailAddress is a text field
    where the user will enter something that is an e-mail address (foo@bar.com) so
    the key layout will have an '@' character in easy access, and
    numberSigned is a numeric field with a sign. If only the class is
    specified, then you get the default/generic variant.

  • Additional flags can be specified that supply further refinement.
    These flags are specific to a class. For example, some flags for the
    text class are textCapSentences,
    textAutoCorrect, and textMultiline.


As an example, here is the new EditText for the IM application's message text view:


    <EditText android:id="@+id/edtInput"
android:layout_width="0dip"
android:layout_height="wrap_content"
android:layout_weight="1"
android:inputType="textShortMessage|textAutoCorrect|textCapSentences|textMultiLine"
android:imeOptions="actionSend|flagNoEnterAction"
android:maxLines="4"
android:maxLength="2000"
android:hint="@string/compose_hint"/>


A full description of all of the input types can be found in the
documentation. It is important to make use of the correct input types that are
available, so that the soft keyboard can use the optimal keyboard layout for the
text the user will be entering.


Enabling resize mode and other window features


The second most important thing for your app to do is to specify the overall
behavior of your window in relation to the input method. The most visible aspect
of this is controlling resize vs. pan and scan mode, but there are other things
you can do as well to improve your user experience.


You will usually control this behavior through the
android:windowSoftInputMode attribute on each
<activity> definition in your
AndroidManifest.xml. Like the input type, there are a couple
different pieces of data that can be specified here by combining them
together:


  • The window adjustment mode is specified with either
    adjustResize or adjustPan. It is highly recommended
    that you always specify one or the other.

  • You can further control whether the IME will be shown automatically when
    your activity is displayed and other situations where the user moves to it. The
    system won't automatically show an IME by default, but in some cases it can be
    convenient for the user if an application enables this behavior. You can request
    this with stateVisible. There are also a number of other state
    options for finer-grained control that you can find in the documentation.


A typical example of this field can be see in the edit contact activity,
which ensures it is resized and automatically displays the IME for the user:


    <activity name="EditContactActivity"
android:windowSoftInputMode="stateVisible|adjustResize">
...
</activity>


Note:Starting from Android 1.5 (API Level 3),
the platform offers a new method,
{@link android.view.Window#setSoftInputMode(int mode)},
that non-Activity windows can use to control their behavior. Calling this method
in your will make your application incompatible with previous versions of the
Android platform.


Controlling the action buttons


The final customization we will look at is the "action" buttons in the IME.
There are currently two types of actions:


  • The enter key on a soft keyboard is typically bound to an action when not
    operating on a mult-line edit text. For example, on the G1 pressing the hard
    enter key will typically move to the next field or the application will
    intercept it to execute an action; with a soft keyboard, this overloading of the
    enter key remains, since the enter button just sends an enter key event.

  • When in fullscreen mode, an IME may also put an additional action button to
    the right of the text being edited, giving the user quick access to a common
    application operation.


These options are controlled with the android:imeOptions
attribute on TextView. The value you supply here can be any
combination of:


  • One of the pre-defined action constants (actionGo,
    actionSearch, actionSend, actionNext,
    actionDone). If none of these are specified, the system will infer
    either actionNext or actionDone depending on whether
    there is a focusable field after this one; you can explicitly force no action
    with actionNone.

  • The flagNoEnterAction option tells the IME that the action
    should not be available on the enter key, even if the text itself is
    not multi-line. This avoids having unrecoverable actions like (send) that can be
    accidentally touched by the user while typing.

  • The flagNoAccessoryAction removes the action button from the
    text area, leaving more room for text.
  • The flagNoExtractUi
    completely removes the text area, allowing the application to be seen behind
    it.


The previous IM application message view also provides an example of an
interesting use of imeOptions, to specify the send action but not
let it be shown on the enter key:


android:imeOptions="actionSend|flagNoEnterAction"


APIs for controlling IMEs


For more advanced control over the IME, there are a variety of new APIs you
can use. Unless special care is taken (such as by using reflection), using these
APIs will cause your application to be incompatible with previous versions of
Android, and you should make sure you specify
android:minSdkVersion="3" in your manifest. For more information,
see the documentation for the href="http://developer.android.com/guide/topics/manifest/uses-sdk-element.html"><uses-sdk>> manifest element.


The primary API is the new android.view.inputmethod.InputMethodManager class, which you can retrieve with Context.getSystemService().
It allows you to interact with the global input method state, such as
explicitly hiding or showing the current IME's input area.


There are also new window flags controlling input method interaction, which you can control through the existing Window.addFlags() method and new Window.setSoftInputMode() method. The PopupWindow
class has grown corresponding methods to control these options on its
window. One thing in particular to be aware of is the new WindowManager.LayoutParams.FLAG_ALT_FOCUSABLE_IM constant, which is used to control whether a window is on top of or behind the current IME.


Most of the interaction between an active IME and application is done through the android.view.inputmethod.InputConnection
class. This is the API an application implement, which an IME calls to
perform the appropriate edit operations on the application. You won't
normally need to worry about this, since TextView provides its own implementation for itself.


There are also a handful of new View APIs, the most important of these being onCreateInputConnection() which creates a new InputConnection for an IME (and fills in an android.view.inputmethod.EditorInfo
structure with your input type, IME options, and other data); again,
most developers won't need to worry about this, since TextView takes
care of it for you.


Monday, April 20, 2009

Introducing home screen widgets and the AppWidget framework

One exciting new feature in the Android 1.5 SDK is the AppWidget framework which allows developers to write "widgets" that people can drop onto their home screen and interact with. Widgets can provide a quick glimpse into full-featured apps, such as showing upcoming calendar events, or viewing details about a song playing in the background.

When widgets are dropped onto the home screen, they are given a reserved space to display custom content provided by your app. Users can also interact with your app through the widget, for example pausing or switching music tracks. If you have a background service, you can push widget updates on your own schedule, or the AppWidget framework provides an automatic update mechanism.

At a high level, each widget is a BroadcastReceiver paired with XML metadata describing the widget details. The AppWidget framework communicates with your widget through broadcast intents, such as when it requests an update. Widget updates are built and sent using RemoteViews which package up a layout and content to be shown on the home screen.

Widget screenshotYou can easily add widgets into your existing app, and in this article I'll walk through a quick example: writing a widget to show the Wiktionary "Word of the day." The full source code is available, but I'll point out the AppWidget-specific code in detail here.

First, you'll need some XML metadata to describe the widget, including the home screen area you'd like to reserve, an initial layout to show, and how often you'd like to be updated. The default Android home screen uses a cell-based layout, so it rounds your requested size up to the next-nearest cell size. This can be a little confusing, so here's a quick equation to help:

Minimum size in dip = (Number of cells * 74dip) - 2dip

In this example, we want our widget to be 2 cells wide and 1 cell tall, which means we should request a minimum size 146dip x 72dip. We're also going to request updates once per day, which is roughly every 86,400,000 milliseconds. Here's what our widget XML metadata looks like:

<appwidget-provider
xmlns:android="http://schemas.android.com/apk/res/android"
android:minWidth="146dip"
android:minHeight="72dip"
android:initialLayout="@layout/widget_message"
android:updatePeriodMillis="86400000"
/>

Next, let's pair this XML metadata with a BroadcastReceiver in the AndroidManifest:

<!-- Broadcast Receiver that will process AppWidget updates -->
<receiver android:name=".WordWidget" android:label="@string/widget_name">
<intent-filter>
<action android:name="android.appwidget.action.APPWIDGET_UPDATE" />
</intent-filter>
<meta-data android:name="android.appwidget.provider" android:resource="@xml/widget_word" />
</receiver>

<!-- Service to perform web API queries -->
<service android:name=".WordWidget$UpdateService" />

Finally, let's write the BroadcastReceiver code to actually handle AppWidget requests. To help widgets manage all of the various broadcast events, there is a helper class called AppWidgetProvider, which we'll use here. One very important thing to notice is that we're launching a background service to perform the actual update. This is because BroadcastReceivers are subject to the Application Not Responding (ANR) timer, which may prompt users to force close our app if it's taking too long. Making a web request might take several seconds, so we use the service to avoid any ANR timeouts.

/**
* Define a simple widget that shows the Wiktionary "Word of the day." To build
* an update we spawn a background {@link Service} to perform the API queries.
*/
public class WordWidget extends AppWidgetProvider {
@Override
public void onUpdate(Context context, AppWidgetManager appWidgetManager,
int[] appWidgetIds) {
// To prevent any ANR timeouts, we perform the update in a service
context.startService(new Intent(context, UpdateService.class));
}

public static class UpdateService extends Service {
@Override
public void onStart(Intent intent, int startId) {
// Build the widget update for today
RemoteViews updateViews = buildUpdate(this);

// Push update for this widget to the home screen
ComponentName thisWidget = new ComponentName(this, WordWidget.class);
AppWidgetManager manager = AppWidgetManager.getInstance(this);
manager.updateAppWidget(thisWidget, updateViews);
}

/**
* Build a widget update to show the current Wiktionary
* "Word of the day." Will block until the online API returns.
*/
public RemoteViews buildUpdate(Context context) {
// Pick out month names from resources
Resources res = context.getResources();
String[] monthNames = res.getStringArray(R.array.month_names);

// Find current month and day
Time today = new Time();
today.setToNow();

// Build today's page title, like "Wiktionary:Word of the day/March 21"
String pageName = res.getString(R.string.template_wotd_title,
monthNames[today.month], today.monthDay);
RemoteViews updateViews = null;
String pageContent = "";

try {
// Try querying the Wiktionary API for today's word
SimpleWikiHelper.prepareUserAgent(context);
pageContent = SimpleWikiHelper.getPageContent(pageName, false);
} catch (ApiException e) {
Log.e("WordWidget", "Couldn't contact API", e);
} catch (ParseException e) {
Log.e("WordWidget", "Couldn't parse API response", e);
}

// Use a regular expression to parse out the word and its definition
Pattern pattern = Pattern.compile(SimpleWikiHelper.WORD_OF_DAY_REGEX);
Matcher matcher = pattern.matcher(pageContent);
if (matcher.find()) {
// Build an update that holds the updated widget contents
updateViews = new RemoteViews(context.getPackageName(), R.layout.widget_word);

String wordTitle = matcher.group(1);
updateViews.setTextViewText(R.id.word_title, wordTitle);
updateViews.setTextViewText(R.id.word_type, matcher.group(2));
updateViews.setTextViewText(R.id.definition, matcher.group(3).trim());

// When user clicks on widget, launch to Wiktionary definition page
String definePage = res.getString(R.string.template_define_url,
Uri.encode(wordTitle));
Intent defineIntent = new Intent(Intent.ACTION_VIEW, Uri.parse(definePage));
PendingIntent pendingIntent = PendingIntent.getActivity(context,
0 /* no requestCode */, defineIntent, 0 /* no flags */);
updateViews.setOnClickPendingIntent(R.id.widget, pendingIntent);

} else {
// Didn't find word of day, so show error message
updateViews = new RemoteViews(context.getPackageName(), R.layout.widget_message);
CharSequence errorMessage = context.getText(R.string.widget_error);
updateViews.setTextViewText(R.id.message, errorMessage);
}
return updateViews;
}

@Override
public IBinder onBind(Intent intent) {
// We don't need to bind to this service
return null;
}
}
}

And there you have it, a simple widget that will show the Wiktionary "Word of the day." When an update is requested, we read the online API and push the newest data to the surface. The AppWidget framework automatically requests updates from us as needed, such as when a new widget is inserted, and again each day to load the new "Word of the day."

Finally, some words of wisdom. Widgets are designed for longer-term content that doesn't update very often, and updating more frequently than every hour can quickly eat up battery and bandwidth. Consider updating as infrequently as possible, or letting your users pick a custom update frequency. For example, some people might want a stock ticker to update every 15 minutes, or maybe only four times a day. I'll be talking about additional strategies for saving battery life as part of a session I'm giving at Google I/O.

One last cool thing to mention is that the AppWidget framework is abstracted in both directions, meaning alternative home screens can also contain widgets. Your widgets can be inserted into any home screen that supports the AppWidget framework.

We've already written several widgets ourselves, such as the Calendar and Music widgets, but we're even more excited to see the widgets you'll write!

Tuesday, April 14, 2009

UI framework changes in Android 1.5

On Monday, we released an early look at the Android 1.5 SDK. Not only does this platform update contain numerous new features, APIs, and bug fixes, but Android 1.5 also brings a new default look for the Android UI framework. After Android 1.0 and 1.1, our designers worked hard to refine and polish the appearance of the system. The screenshots below show the same activity (creating a new contact) on Android 1.1 and Android 1.5:

You can see in this example that the buttons and checkboxes have a new appearance. Even though these changes do not affect binary nor source compatibility, they might still break the UI of your apps. As part of the UI refresh, the minimum size of some of the widgets has changed. For instance, Android 1.1 buttons have a minimum size of 44x48 pixels whereas Android 1.5 buttons now have a minimum size of 24x48 pixels. The image below compares the sizes of Android 1.1 buttons with Android 1.5 buttons:

If you rely on the button's minimum size, then the layout of your application may not be the same in Android 1.5 as it was in Android 1.1 because of this change. This would happen for instance if you created a grid of buttons using LinearLayout and relying on the minimum size yielded by wrap_content to align the buttons properly:

This layout could easily be fixed by using the android:layout_weight attribute or by replacing the LinearLayout containers with a TableLayout.

This example is probably the worst-case UI issue you may encounter when running your application on Android 1.5. Other changes introduced in Android 1.5, especially bug fixes in the layout views, may also impact your application—especially if it is relying on faulty/buggy behavior of the UI framework.

If you encounter issues when running your application on Android 1.5, please join us on the Google groups or IRC so that we and the Android community can help you fix your application.

Happy coding!

Monday, April 13, 2009

Getting ready for Android 1.5

Android 1.5 SDK release!I'm excited to announce that starting today, developers can get an early look at the SDK for the next version of the Android platform. This new version (which will be 1.5) is based on the cupcake branch from the Android Open Source Project. Version 1.5 introduces APIs for features such as soft keyboards, home screen widgets, live folders, and speech recognition. At the developer site, you can download the early-look Android 1.5 SDK, read important information about upgrading your Eclipse plugin and existing projects, and learn about what's new and improved in Android 1.5.

We've also made changes to the developer tools and the structure of the SDK itself. Future Android SDK releases will include multiple versions of the Android platform. For example, this early-look includes Android platform versions 1.1 and 1.5. One benefit of this change is that developers can target different Android platform versions from within a single SDK installation. Another is that it enables developers to install Android SDK add-ons to access extended functionality that might be provided by OEMs, carriers, or other providers. We at Google are using this feature ourselves: this early-look SDK includes an add-on for the Google APIs. This add-on provides support for the Google Maps API, which was previously embedded in the "core" SDK.

To help you prepare your applications for the release of Android 1.5 on phones, over the next few weeks we'll be publishing a series of articles on this blog to highlight new APIs and other changes. In addition to the new APIs that I've mentioned, we'll cover topics such as OpenGL, asynchronous tasks, system settings, and new Activity callbacks.

I encourage you to start working with this early-look SDK, but please know that the APIs for Android 1.5 have not been finalized. The majority of the APIs are settled, but there may be some changes before the final release. As a result, it's very important that you don't release applications based on this early-look SDK, since they may not work on real devices. The applications you release should be built on the final Android 1.5 SDK release, which will be available around the end of this month.

I look forward to seeing all the great apps that use the new capabilities in Android 1.5. Happy coding!

Monday, March 30, 2009

Developer News

For no particular reason other than to celebrate this particular Monday, I wanted to update developers on two Android-related news items.

If you're a developer who will be in the San Francisco Bay Area at the end of May, I hope you'll join us at the 2009 Google I/O developer conference. You might have already seen the sessions we had listed for Android, but today I'm quite pleased to let you know that we've added a few more Android-related sessions. You can find the full list plus abstracts on the Google I/O site, but here are the titles:

  • Turbo-Charge Your UI: How to Make Your Android UI Fast and Efficient
  • Pixel-Perfect Code: How to Marry Interaction and Visual Design the Android Way
  • Supporting Multiple Devices with One Binary
  • Debugging Arts of the Ninja Masters
  • Coding for Life—Battery Life, That Is
  • Writing Real-Time Games for Android
  • Android Lightning Talks

These sessions don't even include the "fireside chat" with the Core Technical Team that we have planned. We're working on still more sessions too; keep an ear to the ground on this blog and the Google I/O site for the latest info. I'm pretty excited about how the Android sessions for Google I/O are coming together. I think it's going to be a great event, and I hope to meet many of you there.

The other topic I want to mention is that our partners at HTC have uploaded a new system image for Android Dev Phone 1 owners. This new image is mostly the same as the one we mentioned earlier this month, but adds voice dialing. Note that not all features will work correctly in all countries, such as voice dialing and Google Voice Search which currently only work well for US English. Additionally, there are some features that we aren't able to make available at all in some countries. For instance, this build can't currently include Google Latitude due to privacy standards in some regions. We'll always keep the ADP1 builds as full-featured as we can, but it's important to remember that these devices are primarily intended for development, and won't necessarily have all the features included on mainstream builds.

I hope this news is useful to you. As always, happy coding!

Android Layout Tricks #3: Optimize with stubs

Sharing and reusing layouts is very easy with Android thanks to the <include /> tag, sometimes even too easy and you might end up with user interfaces that contain a large number of views, some of which are rarely used. Thankfully, Android offers a very special widget called ViewStub, which brings you all the benefits of the <include /> without polluting your user interface with rarely used views.

A ViewStub is a dumb and lightweight view. It has no dimension, it does not draw anything and does not participate in the layout in any way. This means a ViewStub is very cheap to inflate and very cheap to keep in a view hierarchy. A ViewStub can be best described as a lazy include. The layout referenced by a ViewStub is inflated and added to the user interface only when you decide so.

The following screenshot comes from the Shelves application. The main purpose of the activity shown in the screenshot is to present the user with a browsable list of books:

The same activity is also used when the user adds or imports new books. During such an operation, Shelves shows extra bits of user interface. The screenshot below shows the progress bar and cancel button that appear at the bottom of the screen during an import:

Because importing books is not a common operation, at least when compared to browsing the list of books, the import panel is originally represented by a ViewStub:

When the user initiates the import process, the ViewStub is inflated and replaced by the content of the layout file it references:

To use a ViewStub all you need is to specify an android:id attribute, to later inflate the stub, and an android:layout attribute, to reference what layout file to include and inflate. A stub lets you use a third attribute, android:inflatedId, which can be used to override the id of the root of the included file. Finally, the layout parameters specified on the stub will be applied to the roof of the included layout. Here is an example:

<ViewStub
android:id="@+id/stub_import"
android:inflatedId="@+id/panel_import"

android:layout="@layout/progress_overlay"

android:layout_width="fill_parent"
android:layout_height="wrap_content"
android:layout_gravity="bottom" />

When you are ready to inflate the stub, simply invoke the inflate() method. You can also simply change the visibility of the stub to VISIBLE or INVISIBLE and the stub will inflate. Note however that the inflate() method has the benefit of returning the root View of the inflate layout:

((ViewStub) findViewById(R.id.stub_import)).setVisibility(View.VISIBLE);
// or
View importPanel = ((ViewStub) findViewById(R.id.stub_import)).inflate();

It is very important to remember that after the stub is inflated, the stub is removed from the view hierarchy. As such, it is unnecessary to keep a long-lived reference, for instance in an class instance field, to a ViewStub.

A ViewStub is a great compromise between ease of programming and efficiency. Instead of inflating views manually and adding them at runtime to your view hierarchy, simply use a ViewStub. It's cheap and easy. The only drawback of ViewStub is that it currently does not support the <merge /> tag.

Happy coding!